This article introduces how to shrink C drive with Windows 7 shrink volume function, and the solution if cannot shrink system partition with unmovable files or not enough space.
Applies to: Windows 7 32bit (x86) and 64bit (x64).
If you forget to create and edit partition when installing Windows 7 on a new disk, so all disk space except the system reserved partition is occupied by C drive. In this situation, you can shrink C drive to create more partitions. In most of Windows 7 computers, system C drive is running out of space, so many people want to shrink volume D to extend system partition.
This article introduce how to shrink C drive and data drive with Windows 7 Shrink Volume function in native Disk Management. If it works, you can shrink hard drive partition without software. If you cannot shrink system C drive with unmovable files or if Shrink Volume greyed out, run NIUBI Partition Editor.
Shrink C drive in Windows 7 Disk Management
Better than Windows XP, Windows 7 has Shrink Volume function built in Disk Management. It is able to shrink system partition and data volumes without losing data. In fact, it has an advantage than all third party partitioning software: it is able to shrink system C drive without rebooting. But on the other hand, it has many disadvantages.
1. Only NTFS partition is supported
NTFS and FAT32 are most common partition type in Windows 7, but Disk Management can only shrink and extend NTFS partitions. This is one of the reasons why Shrink Volume is disabled.
2. Cannot shrink partition towards right
This is not an issue if you just want to shrink a volume to create new, but if you want to extend a volume by shrinking other one, it is impossible with Windows 7 Disk Management.
When shrinking partition D with Shrink Volume function, Unallocated space can only be made on the right side of D, but to expand C drive with Extend Volume, Unallocated space must be on the left side of D.
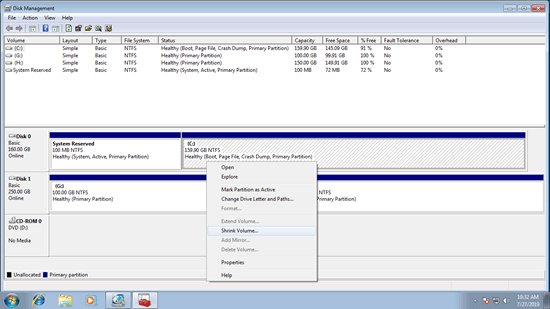
Follow the steps to shrink system partition C in Windows 7 Disk Management:
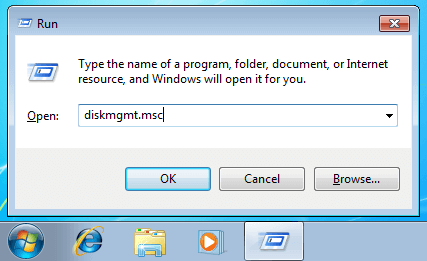
1. Press Windows and R together on the keyboard, type diskmgmt.msc and press Enter to open Disk Management.
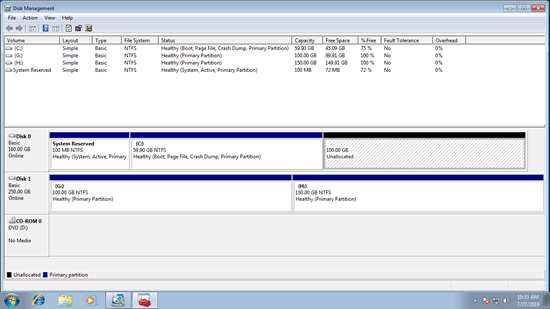
3. Click Shrink to shrink with default maximum available space or enter a smaller amount by yourself (1024MB=1GB).
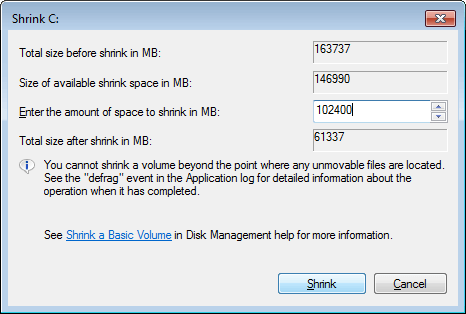
It is the same to shrink partition D or other data volumes.
Can't shrink system partition - not enough space
It is very easy to shrink partition with Windows 7 Disk Management, but you may encounter issue. The most common trouble is not enough space and unmovable files.
When you shrinking any partition (especially to C drive), if you shrink with default maximum amount or even entered a larger amount by mistake, you are very likely receive error - There is not enough space available on the disk(s) to complete this operation.
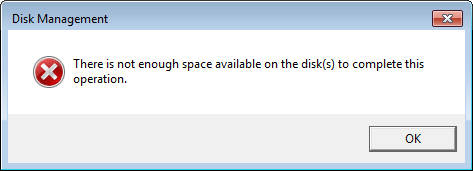
Solution: repeat the shrinking operation by entering a smaller amount by yourself.
Cannot shrink volume because of unmovable files
In the shrinking window, there is a tip - You cannot shrink a volume beyond the point where any unmovable files are located, what does it mean?
For example: C drive is made up of 4 blocks, if any unmovable files are located in block 3, you cannot shrink C drive to block 2 or 1 even though there is free space.

These unmovable files include Paging File, Hibernation and other larger files. So comparing with data volumes, it is more likely encounter this issue while shrinking system partition C. In some computers, Disk Management gives only little space to shrink. In few computers, Disk Management cannot shrink partition with even 1MB.
Solution: run third party software such as NIUBI Partition Editor, which can move these "unmovable" files.
Drag and drop to shrink system C drive and data volumes
Comparing with Windows native Disk Management tool, NIUBI Partition Editor has benefits while shrinking partition volume:
- Both NTFS and FAT32 partitions are supported.
- Partitions can be shrunk towards either side and make Unallocated space on either left or right side.
- It is able to move these unmovable files, so you can shrink volume to minimum size if you want.
- Unallocated space shrunk from a partition can be easily combined to other volume on the same disk.
Steps to shrink volume in Windows 7 (32 and 64 bit):
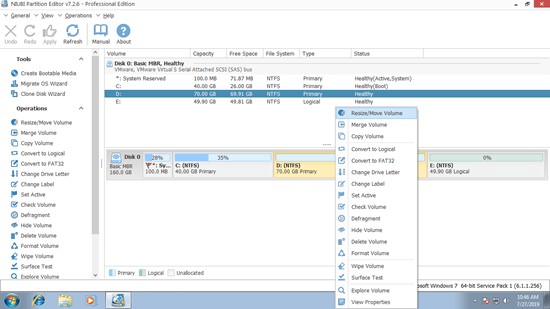
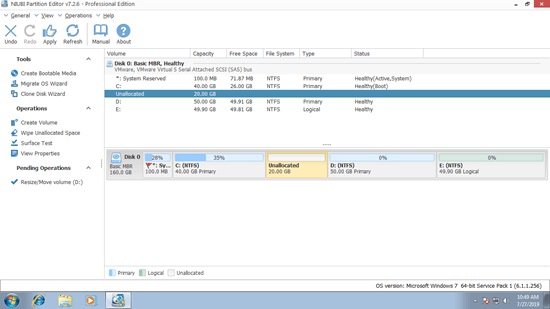
1. Download NIUBI Partition Editor, right click the partition that you want to decrease (here is D:) and select Shrink Volume.
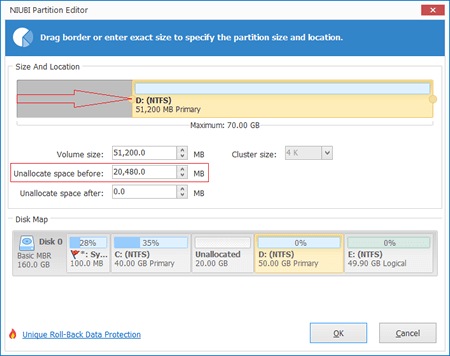
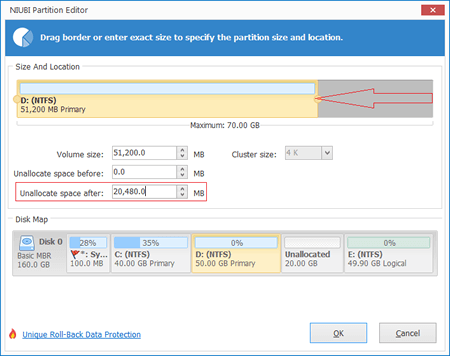
2. In the pop-up window you have 2 options.
If you drag left border towards right, or enter an amount in the box Unallocated space before (1024MB=1GB):
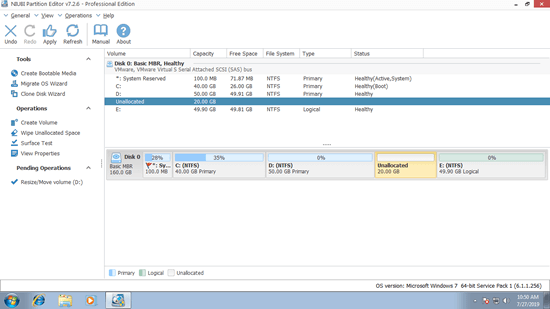
Then Unallocated space is made on the left of D.
3. Click Apply on top left to execute. (All operations before clicking Apply only work in virtual mode and real disk partition won't be modified.)
Watch the video guide how to shrink partition in Windows 7:
The steps are the same no matter you want to shrink system C drive or any data partition in Windows 7. Follow the steps to extend partition after shrinking.
NIUBI Partition Editor has free edition for home computer users, besides shrinking and extending partition, it helps move, merge, convert, defrag, wipe, hide partition, scan bad sectors and much more.

