
Before saving files to a brand-new hard disk, you must initialize this disk. Then, create a new volume and format it with a file system. When initializing a brand-new disk in Windows Server 2019, you can select either MBR or GPT. On an MBR disk, you can only create 4 Primary partitions and use a maximum of 2TB of disk space. If you initialize a 4TB disk as MBR, the remaining 2TB of Unallocated space cannot be used to create new volumes or be added to other partitions.
When you install Windows Server 2019, the system disk will be initialized as GPT by default. If you have initialized a disk as MBR and already saved files to this disk, is it possible to convert MBR to GPT without losing data? The answer is yes. This article introduces 3 ways to convert MBR to GPT in Windows Server 2019.
1. Convert MBR to GPT in Server 2019 via Disk Management
This method is only used when there is no partition on the MBR disk or you can delete all partitions on it.
Besides creating, deleting, and formatting partitions, Windows Disk Management can convert a disk between MBR and GPT. However, there must be no partitions on the disk. If there are one or more partitions, you must delete them in advance. As you can see in the screenshot, the option "Convert to GPT Disk" is grayed out in Server 2019 Disk Management when right-clicking an MBR disk.
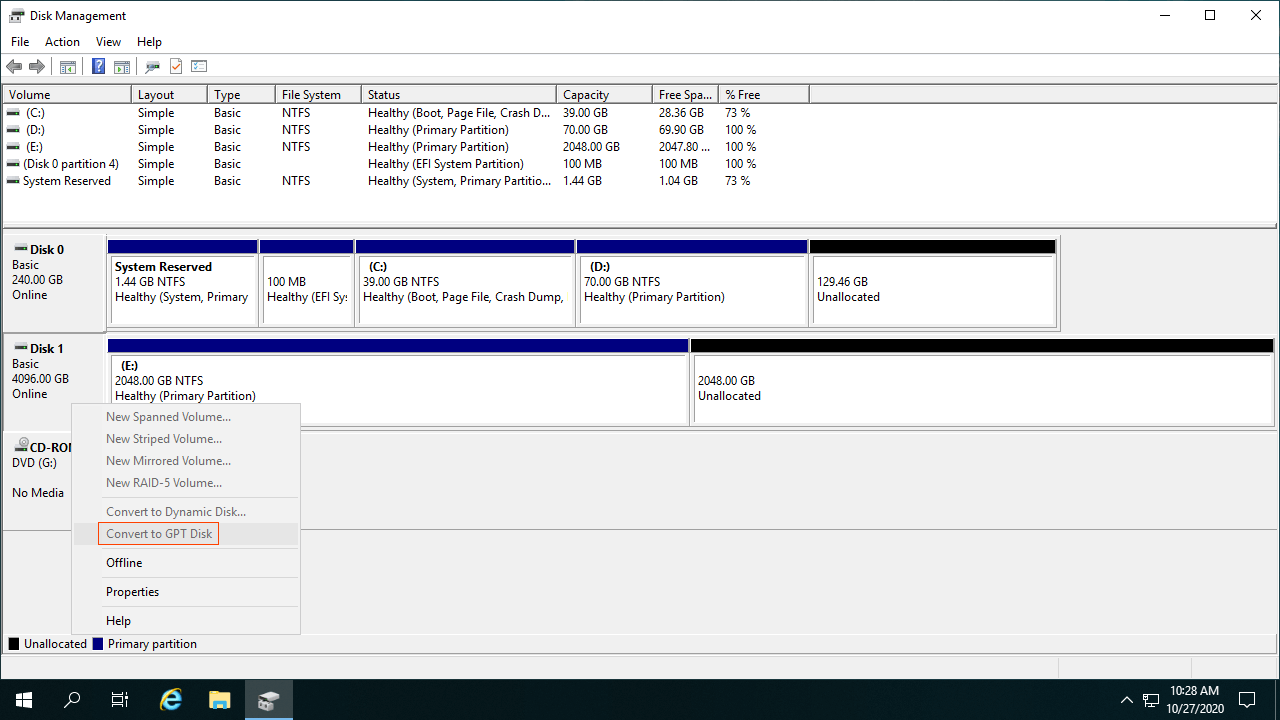
How to convert MBR to GPT in Server 2019 using Disk Management:
- Press the Windows + X keys together on your keyboard and click Disk Management in the list.
- Right-click a partition on this MBR disk and select "Delete Volume". Repeat to delete all other partitions on this disk. Remember to transfer your files in advance.
- Right-click the leftmost area of this MBR disk and select "Convert to GPT Disk". In a short while, the conversion will be completed.
Obviously, it is not a good idea to convert a disk like that. There is a better way to convert MBR to GPT without losing data in a Windows 2019 server. Before starting, confirm if you want to convert a system disk to GPT or convert an MBR disk with only data.
2. Convert a Disk with the MBR2GPT Command in Windows Server 2019
This method is only used for converting the system disk from MBR to GPT.
You should pay more attention if you want to convert the system disk to GPT, because the operating system and programs are installed on this disk. Few tools can ensure that the server remains 100% bootable and intact after converting the system disk from MBR to GPT. Therefore, you had better back up in advance and run MBR2GPT in Server 2019, which is a native command-prompt tool. It is very easy to convert a disk with the MBR2GPT command, but your disk partition layout must meet some requirements.
Preconditions for converting a Server 2019 disk with the MBR2GPT command tool:
- There must be no Logical drive on this disk. If there is, follow the method to convert the Logical partition to Primary.
- There can be a maximum of 3 Primary partitions on this disk. If there are more, follow the method to move a partition to another disk. You may either keep the partition on another disk or move it back after converting to a GPT disk.
- There should be no partitions not supported by Windows on the disk, such as EXT2 or EXT3.
Common disk partition configurations and errors while converting MBR to GPT in Windows Server 2019:
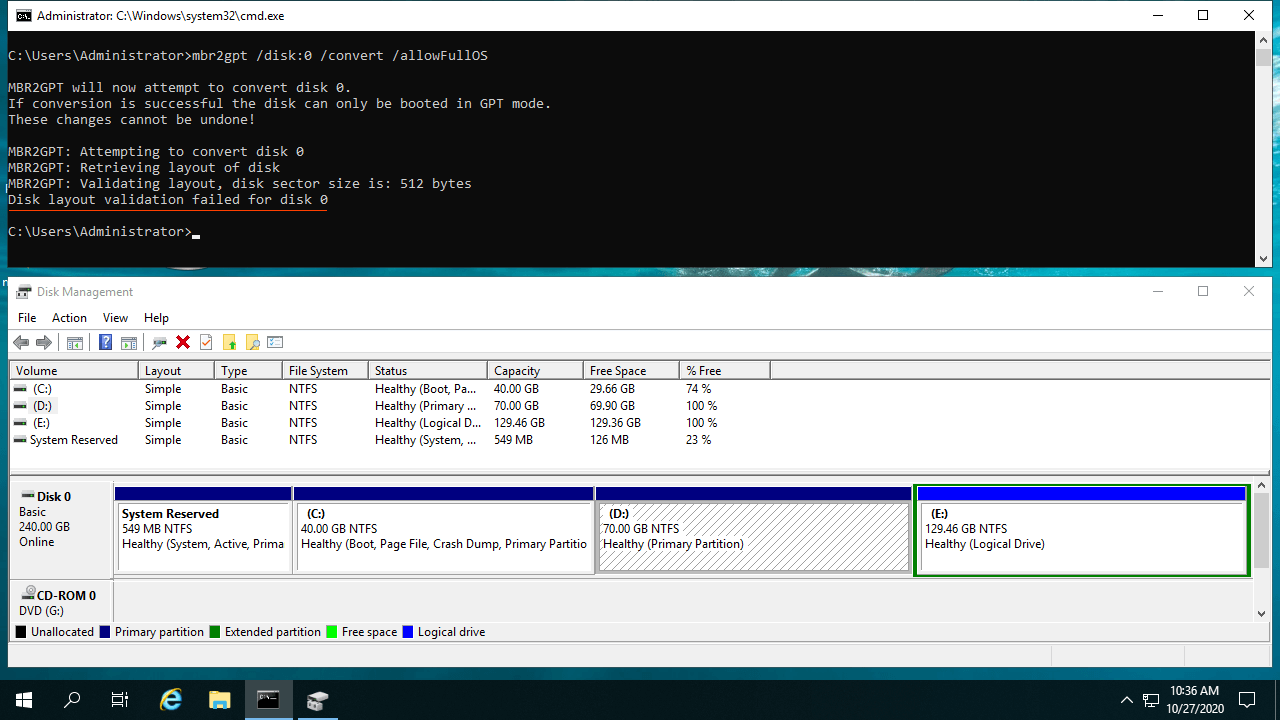
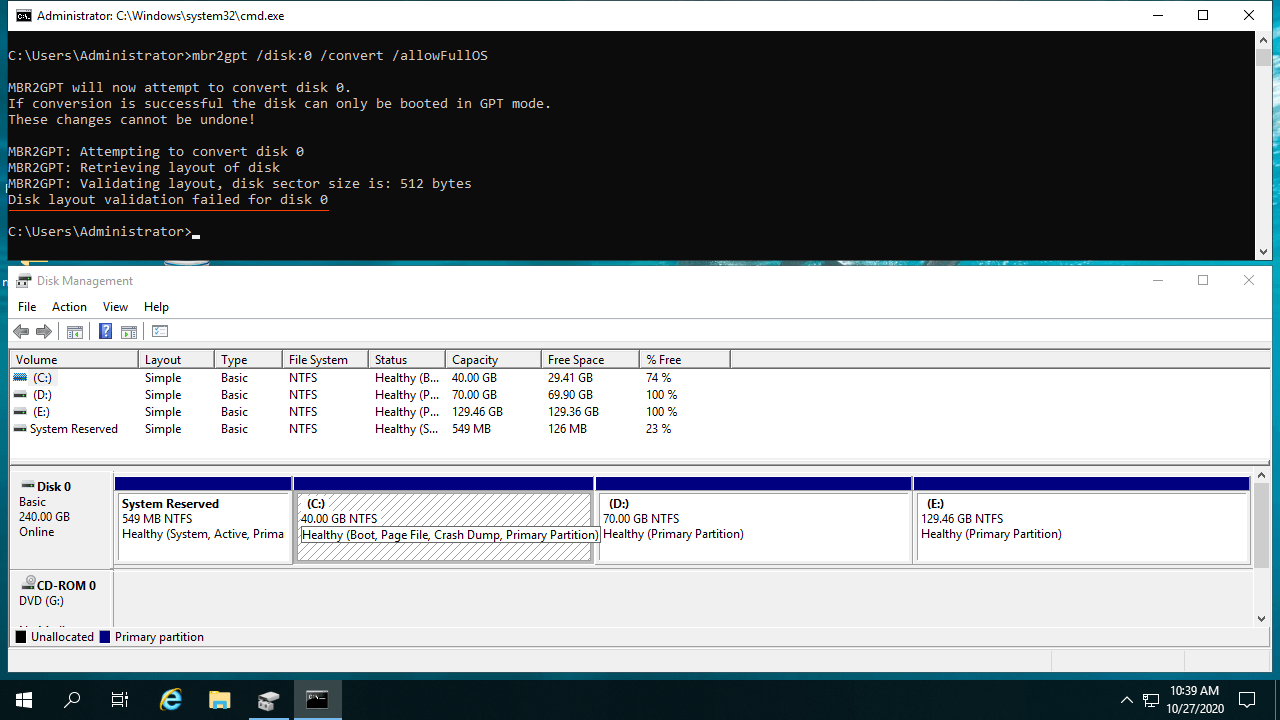
As seen in the screenshots, when converting an MBR disk to GPT for a Windows 2019 server, the error "Disk layout validation failed for disk 0" may appear. This is because there is a Logical drive in the first screenshot, and there are 4 partitions in both screenshots.
MBR2GPT will validate the disk partition layout first; if the validation fails, the conversion will not continue. If it converts successfully, the changes cannot be undone, and there is no native Windows tool to convert GPT to MBR without losing data.
Steps to convert MBR to GPT in Windows Server 2019 with the MBR2GPT command:
- Make a system backup in advance.
- Press the Windows + R keys together, input cmd, and press Enter.
- In the command prompt window, input mbr2gpt /disk:0 /convert /allowFullOS and then press Enter. If your system disk is not 0, replace it with the right number.
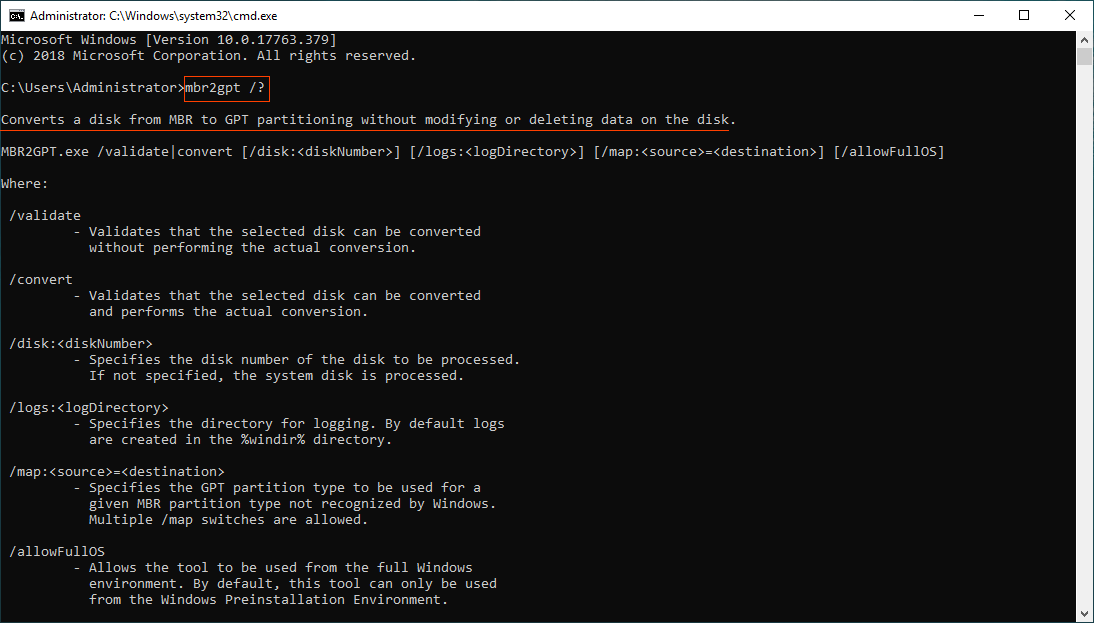
If you want to read more about MBR2GPT, input mbr2gpt /? in the command window or visit this page.
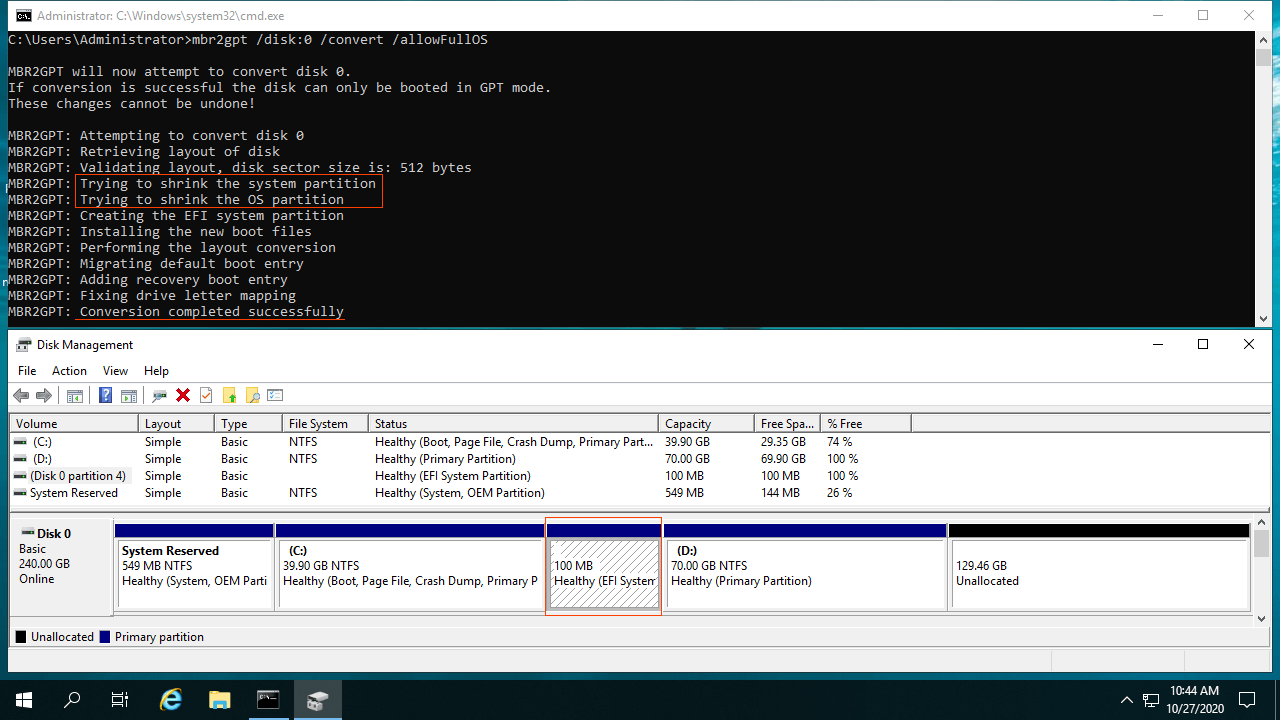
There is one more point you should know. If you convert an MBR disk without extending the System Reserved partition, there will be an EFI partition created behind the C drive after converting to a GPT disk. Disk Management cannot do anything to this EFI partition.
After converting MBR to GPT without extending System Reserved partition:
Extended System Reserved partition before converting MBR to GPT:
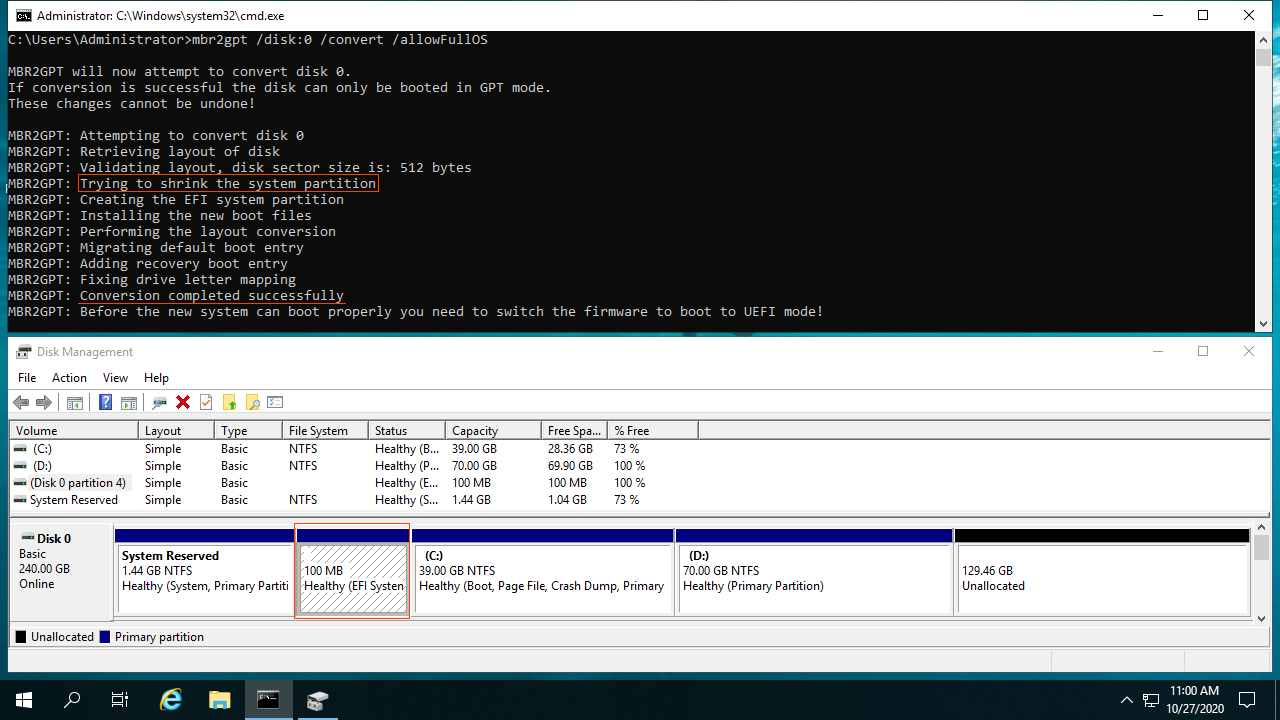
As seen in the screenshots, the MBR to GPT conversion is completed successfully regardless of whether the System Reserved partition is extended or not. Why can the EFI partition be created on the left or right of the C: drive? MBR2GPT will first shrink the System Reserved partition; if there is not enough free space, it will shrink the boot partition (C drive) instead. If you want to place the EFI partition to the left of the C drive after converting to a GPT disk, follow the video to extend the System Reserved partition (2GB is absolutely enough).
3. How to Convert MBR to GPT in Server 2019 with a Converter
This method is used for converting an MBR disk to GPT without an Operating System.
It is very easy to convert MBR to GPT with NIUBI Partition Editor. There is only one requirement: all partitions on the MBR disk should be NTFS or FAT16/32.
Steps to convert MBR to GPT in Server 2019 with NIUBI Partition Editor:
- Download this program, right-click the leftmost area of this MBR disk, and select "Convert to GPT Disk".
- Simply click "Yes" to confirm, then a pending operation is added.
- Click Apply on the top left to take effect.
Watch the video to see how to convert an MBR disk to GPT in Windows Server 2019:
Besides converting an MBR disk to GPT in Windows Server 2019/2022/2025 and previous Server 2003/2008/2012/2016, NIUBI Partition Editor helps you convert a partition between Primary and Logical, and convert NTFS to FAT32 without losing data. It also helps you shrink, extend, move, and merge partitions to optimize disk space, clone a disk or partition to migrate the Operating System and data, create, delete, format, hide, defrag, wipe partitions, and much more.
 © 2009 - NIUBI Technology All Rights Reserved. |