When C: drive is getting full, it cannot be better if you can extend C drive without losing data. Nobody likes to reinstall operating system and all programs. In Windows 7 and all subsequent versions, there are "Shrink Volume" and "Extend Volume" functions in Disk Management. Many people try to shrink D and extend C drive with this native tool. But after shrinking D or other partition, Extend Volume is disabled for C drive. This article introduces the reasons why Extend Volume is disabled in Disk Management and how to fix this issue with free tool easily.

Reasons why Extend Volume option is disabled for C drive
There are 2 common reasons why Extend Volume is disabled for C: drive in Windows 11/10/8/7 Disk Management, I'll explain one by one.
Reason 1: No required unallocated space
A 300GB physical hard disk cannot be increased to 500GB, so before extending a partition there must be "unallocated" space. As the name, this space is not allocated to any partition. To get unallocated space, you may either delete or shrink a partition. After deleting a volume, all its disk space will be converted to unallocated but you'll lose all files in it. After shrinking a volume, only part of free space will be converted to unallocated but you won't lose files in it.
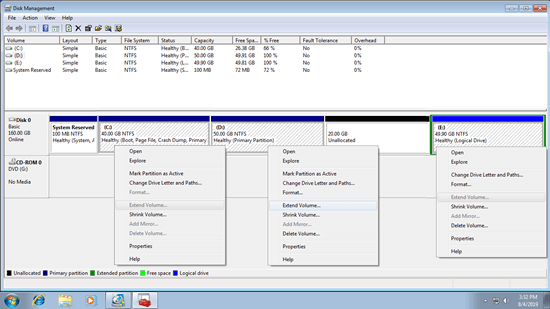
Obviously, it's better to get unallocated space by shrinking a volume. The problem is that you can't extend C drive after shrinking D or any other volume with Disk Management. As the screenshot in my computer, Extend Volume is disabled for C: and E: drive after shrinking D.
This is because:
- "Shrink Volume" can only make unallocated space on the right while shrinking partition.
- "Extend Volume" only works when there's contiguous unallocated space on the right.
The unallocated space that shrunk from D is non adjacent to C drive and is on the left of E drive, therefore, Extend Volume option is disabled in Disk Management.
Reason 2: Different partition type
Because "Extend Volume" is not enabled for C drive after shrinking D, some people try to delete D drive instead. Extend Volume will be enabled if D is a primary partition. But if D: is a logical drive, you still cannot extend C drive in Disk Management after deleting D.
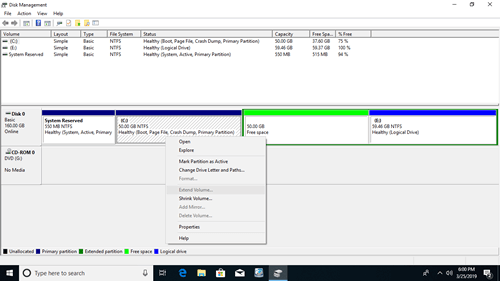
As you see in the screenshot, Extend Volume option is disabled for C drive after deleting D.
This is because:
On MBR style hard disk, Free space that deleted from a logical partition can't be extended to any primary partition. unallocated space that deleted from a primary partition can't be extended to any logical drives.
On MBR disk, you can only create 4 primary partitions or 3 primary plus an Extended partition. Unlike primary partition that works as independent unit, logical drives are part of the extended partition, this is the reason why it is shown as Free after deleting.
Why Extend Volume is not enabled for data volume
Reason 3: File System is not supported
Extend Volume function only support extending NTFS partition, it cannot extend FAT32 or any other types of partition even if there is adjacent unallocated space on the right side.
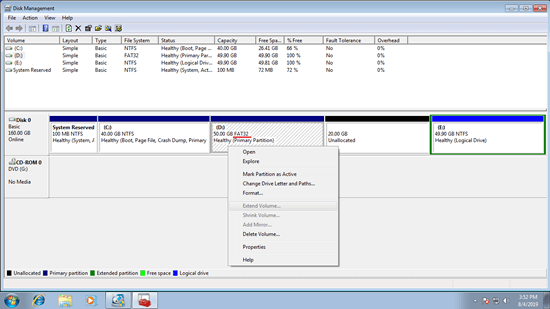
As you see in the screenshot, there's 20GB unallocated space next to D: drive, but because it is a FAT32 partition, Extend Volume is disabled.
In most of Windows computers, system C drive is formatted with NTFS, so this issue is just common for data drives.
Reason 4: 2TB limitation of MBR disk
Nowadays, hard disks are much larger. It is common to use 2TB+ disk for personal computers and 10TB+ RAID array for servers. If you initialized a 4TB disk as MBR, you can only use 2TB disk space, the remaining 2TB space is shown as unallocated. This unallocated space can't be used to create new volume or extend other partition via Disk Management.
As the screenshot in my test computer, drive H is formatted as NTFS and there is right contiguous unallocated space, but Extend Volume is still disabled. If you right click this unallocated space in Disk Management, all options are unavailable.
What to do when Extend Volume is disabled in Windows 11/10/8/7
Download NIUBI Partition Editor, you'll see all storage devices with partition structure and other information on the main window, follow the corresponding solution below according to your own disk partition configuration.
Solution 1: Move partition and unallocated space
When Extend Volume is disabled for C drive after shrinking D or other volume, move partition D to the right and make unallocated space contiguous to C drive, follow the steps below:
- Run NIUBI Partition Editor, right click drive D and select "Resize/Move Volume", drag the middle of D drive towards right in the pop-up window.
- Right click C: drive and select "Resize/Move Volume" again, drag right border towards right to combine unallocated space.
- Click Apply on top left to execute.
Solution 2: Merge adjacent unallocated space
When there's adjacent unallocated space, Extend Volume is disabled because of non-supported FAT32 partition or the restriction between primary and Logical partition, follow the steps below:
- Run NIUBI Partition Editor, right click the adjacent partition and select "Resize/Move Volume".
- Drag the border towards other side to combine unallocated space in the pop-up window.
- Click Apply on top left to execute.
Solution 3: Convert 2TB+ MBR disk to GPT
When Extend Volume option is disabled on a 2TB+ MBR disk, follow the steps below:
- Run NIUBI Partition Editor, right click front of this disk and select "Convert to GPT Disk".
- Run "Resize/Move Volume" function and combine unallocated space to the partition(s) that you want to expand.
When Extend Volume is disabled for C drive in Windows 11/10/8/7, NIUBI Partition Editor has free edition to help you. If Extend Volume is disabled in Windows Server 2008/2012/2016/2019/2022, the methods are the same, but you need Server or higher edition.
Better than other tools, NIUBI Partition Editor has innovative technologies to protect system and data such as:
- Virtual Mode - all operations you do are listed as pending for preview, real disk partitions won't be changed until click Apply to confirm.
- Cancel-at-will - if you applied incorrect operations, you can cancel the ongoing operations without damaging partitions.
- 1-Second Rollback - if any error is detected while resizing partition, it automatically reverts computer to original status in a flash.
It is 30% to 300% faster because of the advanced file-moving algorithm, it's very useful when you shrink, move and copy partition with large amount of files. As a disk partition management toolkit, it helps you do many other disk partition management operations.


