If there's only C drive on the system disk and you save everything to it, there will be 2 major problems: your computer will run slower and slower. It will be difficult to find the files you need. You'd better create more partitions in Windows 11 computer. For example, C drive for operating system, D (or E) drive for programs. If your SSD is big enough, you can create a third partition to save the files that should be loaded fast. To create new partition in Windows 11 laptop/desktop, you may use native Disk Management or free partition software. This article introduces how to create partition in Windows 11 computer with both kinds of tools.

Create more partition in Windows 11 without any software
Because the size of a hard disk is fixed, if you want to make more partitions in Windows 11 computer, you must delete or shrink an existing partition to get "Unallocated" space. To create new partition in Windows 11 laptop/desktop/tablet, the native Disk Management has the ability to shrink partition and make Unallocated space without losing data, but comparing with disk partition software, it has some limitations.
How to create partition in Windows 11 Disk Management without software:
- Right click Windows logo on taskbar and then click Disk Management.
- Right click C: drive (or other large partition) and select "Shrink Volume" option.
- Enter an amount of space (1024MB=1GB) and then click Shrink. Unallocated space will be made on the right of C drive.
- Right click this Unallocated space and select "New Simple Volume" option. Follow up the wizard.
- If you want to create more partitions in Windows 11 computer, do not use all Unallocated space, enter a smaller amount instead.
Limitations to create partition in Windows 11 with Disk Management:
- It cannot shrink C drive beyond the point where unmovable files are located. That means, it can only shrink little space even if there's plenty of free space in C drive.
- It can only shrink a partition towards left and create new volume on the right.
- There's little option when you create new partition with Windows 11 Disk Management.
- It can only shrink NTFS partition. If you want to shrink FAT32 partition to create new volume, Disk Management is useless.
To create volume in Windows 11 computer, NIUBI Partition Editor is better choice. It has free edition for Windows 11/10/8/7/Vista/XP home computer users.
Create new partition in Windows 11 with free partition editor
Comparing with Disk Management, NIUBI Partition Editor has more advantages when creating volume in Windows 11 computer:
- It is able to shrink a partition to minimum size if you want, because it can move these "unmovable" files.
- It is able to shrink a partition and create new volume on either left or right side.
- You just need to click, drag and drop on the disk map to shrink and create volumes.
- It can shrink and create both NTFS and FAT32 partition.
- Much more options when creating new volume.
How to create new volume in Windows 11 with free partition editor:
- Download NIUBI free edition, right click any NTFS or FAT32 partition and select "Resize/Move Volume" option.
- Drag either border towards the other one in the pop-up window. If you drag left border towards right, Unallocated space is made on the left.
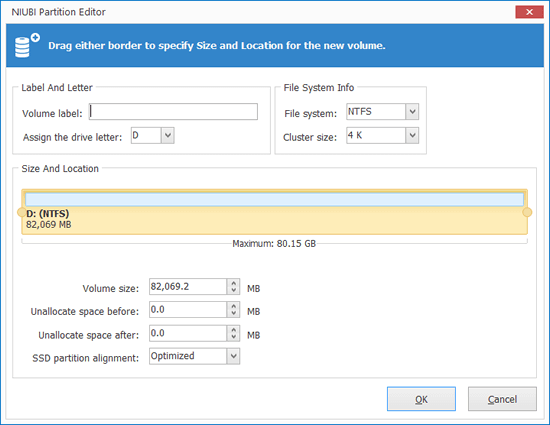
- Right click this Unallocated space and select "Create Volume" option. There are many options in the pop-up window. You can add a volume label, select drive letter, file system and cluster size. You can also specify the partition size and location.
![]()
- Click Apply on top left to take effect.
Tips: if you want to create several partitions with Unallocated space, you can drag either border in the middle or enter an amount in "Volume size" on the bottom.
Watch the video how to create partition in Windows 11 computer:
Besides creating new partition in Windows 11/10/8/7/Vista/XP computer, NIUBI Partition Editor helps you do many advanced disk partition management operations such as shrink, extend, merge, move, convert, defrag, hide, wipe, scan bad sectors. Free edition is 100% clean without any bundled plugins.


