Low Disk Space is the most common hard disk issue in all Windows versions. Though Windows 10 has been released for a long time, many people still use Windows 7. To most of the computer users, low disk space issue is annoying, so this article introduces easy and effective way to fix C drive low disk space in Windows 7 (32 and 64 bit) completely.

About Low Disk Space
When system C drive is running out of space and becomes full, you'll find that C drive changed to be red in Windows Files Explorer, for example:
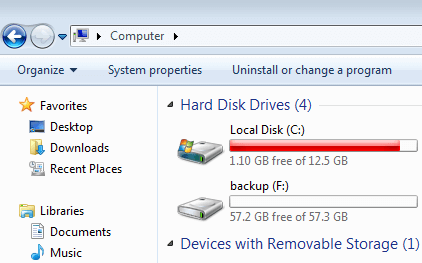
It is dangerous in this situation, because there is no free space to install Windows Updates or applications. Meanwhile, you'll suffer from computer performance down, in addition, system runs much slower, stuck or reboot unexpectedly. Some people do not pay enough attention, so the system crash finally because of no free space in C drive. This is the reason why Microsoft creates such Low Disk Space warning.
When a hard drive partition is running low on free space, you'll receive a pop-out balloon warning in the System Tray with warning message - "You are running very low on disk space on OS (C:). To free space on this drive by deleting old or unnecessary files, click here…". Windows 7 checks for available disk space every 10 minutes by default, and the pop up remains for 10 seconds. By default these thresholds are 200MB, 80MB, and 50MB respectively.
Then what is the right way to fix this low disk space issue?
Solution to fix low disk space in Windows 7
Some people tried to delete files, uninstall program or other methods, so the Low Disk Space warning notification is disabled, but it pops up again in the near future. This is the reason why this issue is annoying, you need a complete solution to solve this problem, generally speaking, there are 3 steps.
Step 1 – Reclaim disk space
As I said above, it is urgent when system partition C is running low on disk space. So you'd better get from free space to keep the computer running in right way. The common method is reclaim disk space by deleting the unnecessary and junk files. To do this, there are several ways such as deleting files manually, cleaning up with 3rd-party program or free up disk space with Windows 7 built-in Disk Cleanup utility. Windows Disk Cleanup is the first and best choice, because it is able to delete most common types of junk files fast and safely.
To run Windows 7 Disk Cleanup, you may simply click the Low Disk Space warning when it pops up, or run from Windows Explorer, steps:
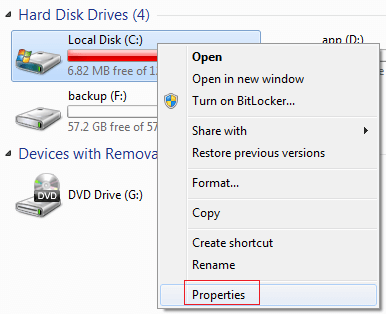
Step 1: Open File Explorer, right click C drive and click Properties:
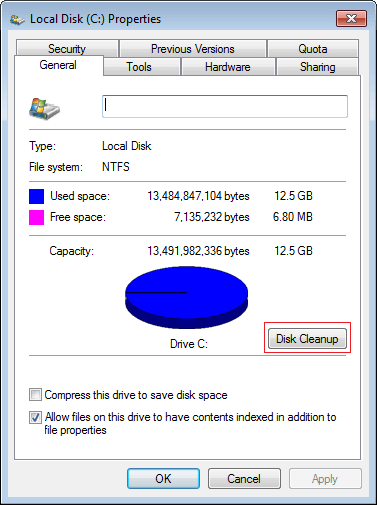
Step 2: Click Disk Cleanup
Step 3: Select the files that you want to delete and click OK to proceed.
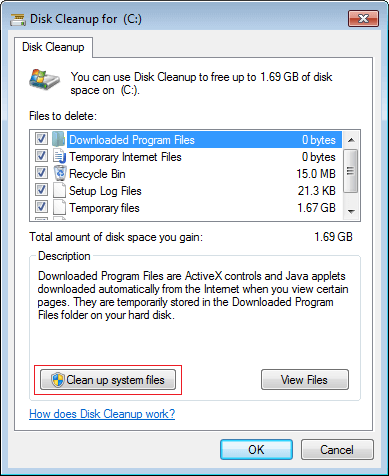
Step 4: Repeat to clean up system files in the same window.
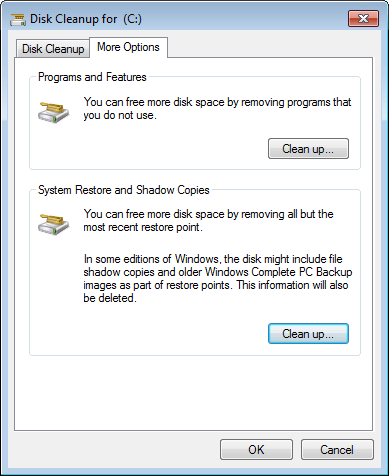
To get more free space, you may switch to More Options tab, where you can remove some installed programs and System Restore points.
After freeing up space with Disk Cleanup, you'll get some free space in C drive. To the computer that never or have not done this step for a long time, you may get over 10GB free space. But this is not enough, because these free space will be eaten up quickly by new generated junk files. You need to add more free space to C drive from other partitions.
Step 2 – Increase size of C drive
All disk drives are allocated while installing Operating System or by OEM manufacturers, but you can change size of the allocated partitions without reinstalling OS and programs.
This step is very important especially to the computer that C drive is created small. For example: if you use a 16GB iPhone, you have to delete files and clean up very frequently, but if you use a 256GB device, you won't encounter the space issue for a long time.
So extending C drive as large as possible, any existing Unallocated or free unused space inside of other drives on the same disk can be moved into C drive.
Download NIUBI Partition Editor and follow the steps in the video to expand C drive partition in Windows 7.
Caution: there is potential system and data damage risk if resizing partition with unreliable tool, so you'd better back up first and use safe partition software.
Better than other software, NIUBI Partition Editor provides 1 Second Rollback, Virtual Mode and Cancel-at-will technologies to protect system and data.
Step 3 – regular maintenance
The larger C drive is, the less probability to encounter low disk space issue. But new junk and unnecessary files are produced continuously, so you need to run Windows Disk Cleanup monthly to delete new generated junk files, then free space and files will achieve a balance. In addition, you'd better consider the options:
- Install new programs to another separate partition such as D.
- Change the default file output path to other large partitions, especially for the program for pictures, videos, games, projects, etc.
- If the hard disk is small and you cannot get enough free space from other partitions, consider cloning to a larger disk.
In Summary
When low disk space alert pops up in Windows 7, you'd better fix this issue as fast as possible. To do this, there are 3 steps: clean up disk to get some precious free space, then run NIUBI Partition Editor to expand C drive to as large as possible, run Disk Cleanup to delete new junk files monthly. After these steps, you can solve Windows 7 low disk space issue permanently.

