The same with previous Windows version, disk partition in Windows Server 2019 runs out of disk space, too. To data drives that used for backup or projects, you may transfer files and change files output location to other drives. But to system C drive, it is much more complicated. This article introduces how to free up disk space in Windows Server 2019 with Disk Cleanup and other methods, then you can reclaim disk space in C drive. If you cannot reclaim enough free space, you'd better add more from other partitions.
Run Windows Server 2019 Disk Cleanup utility
The same with previous versions, Windows Server 2019 has built-in "Disk Cleanup" utility to help free up disk space. It can scan and delete most of unnecessary and junk files in your disk drive. I use Disk Cleanup from Windows XP whose GUI and steps keep the same over 10 years. I still like to use this native tool, because it is easy and fast, the most important, it's safe.
How to free up disk space in Windows Server 2019 via Disk Cleanup tool:
- Press Windows and R together on your keyboard, type cleanmgr and press Enter.
- Select C: drive in the drop-down box and click OK.
- Click the check-boxes of the files that you want to delete.
- Click OK and Disk Cleanup will begin to clear up junk files.
If you don't want to select files manually every time, follow the steps to clean up with command automatically.
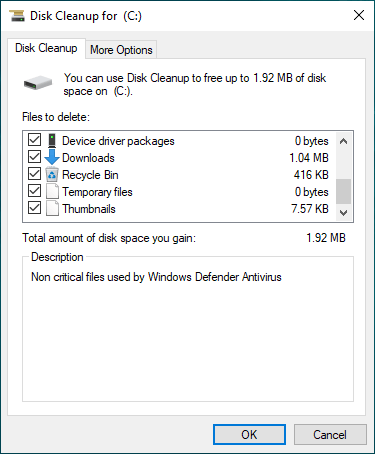
My test server is new installed, so there are few junk files to clean up. To the servers that are running for a long time but never clean up disk, you'll get much more free space. If you cannot get over 20GB free space, you may try the additional methods below.
Additional options to free up disk space in Windows Server 2019
1. Delete Shadow Copies
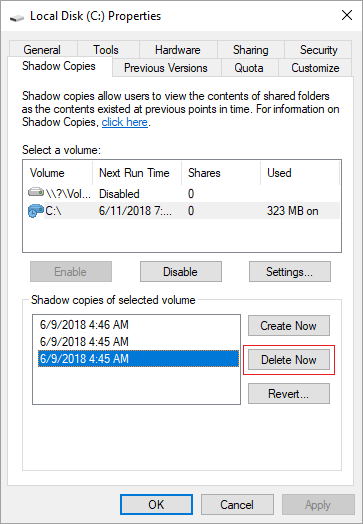
If you enabled Shadow Copy, you can delete the previous copes.
- Open Window File Explorer
- Right click C drive and click Properties, and then switch to Shadow Copies.
- Select the previous copies and click Delete Now.
2. Reset Recycle Bin
All files that deleted by pressing DEL without SHIFT key will go to Recycle Bin, where you can revert these files to original location manually if you deleted them by mistake. Recycle Bin use part of space of C drive by default, so more files in Recycle Bin means less free space in C drive.
You can change the location of Recycle Bin to other larger partition.
- Right click Recycle Bin.
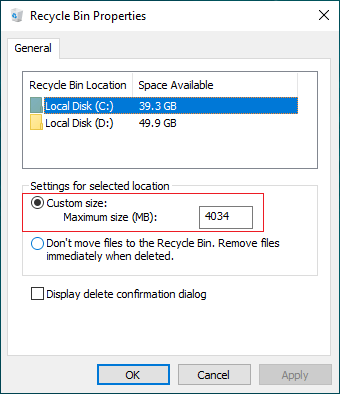
- Select the drive for Recycle Bin.
- Select Customer size and enter an amount.
3. Reset Page file
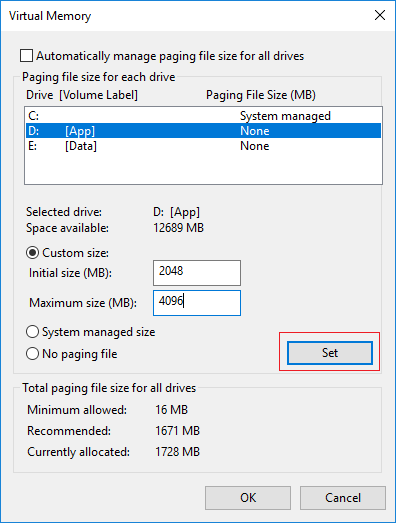
Page file uses part of disk space as virtual RAM and it is located in C drive by default. You can change it to other partition when C drive is running low. Steps:
- Press Windows and R on keyboard to start Run.
- Type sysdm.cpl ,3 and press Enter.
- Click Settings under Performance in Advanced tab.
- Click Change under Virtual Memory.
- Uncheck Automatically manage paging file size for all drives on the top.
- Select D: or other drive, enter amount of Initial size and Maximum size in Customer size radio box, and then click Set.
- Select C: drive and select No paing file radio box, then click Set.
- Click OK. (It may requires reboot to take affect)
4. Uninstall apps
You may uninstall some programs that you no longer use or that came preinstalled on your computer from the manufacturer. Steps:
- Open Settings
- Click Apps > Apps & features
- Click the items that you want to remove and click Uninstall.
5. Save files to new location
You can change the default save locations for apps, documents, music, pictures, and videos to other place, so these types of new files will be saved to other partitions.
- Open Settings.
- Click System> Storage.
- Under "More storage settings", click Change where new content is saved.
- Click the drop-down menu to select new location.
6. Change output location
All programs are installed to C drive by default and many of them output files there, too. The programs for videos and projects, as well as some Windows services output many large files, so you’d better change the default output location to other large drives.
7. Turn on Storage Sense
Storage Sense can free up disk space automatically when a drive is running out of space. It can delete temporary files and files in Recycle Bin and the Downloads folder. To enable Storage Sense in Windows Server 2019:
- Open Settings
- Go to System > Storage
- Switch Off to On under Storage Sense on the right side.
Add more free space from other partitions
If you search by Google, you may find 10+ methods to free up space in Windows Server 2019/2022. Of course you may try all of them if you have much time. But to get plenty of free space in C drive, the most effective method is moving free space from other partitions.
Partitions are already allocated, but you can change partition size without losing data. Run safe partition software to shrink a large partition and get unallocated space on the same disk. Then add Unallocated space to C drive. In this way, there will be plenty of free space in C drive again, operating system, programs and anything else keep the same with before.
Download NIUBI Partition Editor and follow the steps in the video:
- This software is designed to work in virtual mode first, real disk partitions won't be changed until click Apply to confirm.
- If you use any types of hardware RAID arrays, do not break array or do any operation to RAID controller, simply follow the steps in the video.
- If entire disk is full, follow the steps to clone disk to a larger one and add additional space to C drive.
Besides shrinking and extending partitions, NIUBI Partition Editor helps do many other disk and partition management operations.

