
When the C: drive is getting full in Windows Server 2019, you can increase the C drive space without recreating partitions or reinstalling the operating system. Existing disk partitions can be safely resized without losing data. You can use the native Disk Management tool, but it requires deleting the adjacent partition. Therefore, the best choice is using safe partition software to expand the system partition without deleting anything. This article explains how to extend C drive in Windows Server 2019 without losing data.
1. Increase C Drive Space in Server 2019 with Native Tool
The Windows Server 2019 native Disk Management utility features built-in Shrink Volume and Extend Volume components to help administrators change partition sizes. However, this native utility cannot extend the system drive by simply shrinking another volume. The "Extend Volume" function strictly requires unallocated space to be contiguous and directly on the right side of the target partition. When you shrink the D drive, the resulting unallocated space is non-contiguous to the C drive, causing the "Extend Volume" option to be greyed out.
To safely extend C drive in Windows Server 2019 environments without third-party software, you must entirely delete the contiguous right partition, such as the D or E drive. Additionally, this adjacent partition must be structured as a primary volume. In contrast, professional partition software allows you to shrink a data volume and generate unallocated space on its left side. This enables you to extend the C drive seamlessly without deleting any partitions.
How to extend C: drive in Server 2019 with Disk Management:
- Migrate all files stored on the contiguous partition D (or E drive on some servers) to an alternative storage location.
- Press the Windows key + X on your keyboard and select Disk Management from the list.
- Right-click the D drive and select "Delete Volume" to release it as unallocated space.
- Right-click the C drive, select "Extend Volume", and click "Next" through the sequential wizard steps until you click "Finish".
Important limitations when extending partitions via Disk Management:
- The unallocated space created by deleting a volume must reside directly next to the C drive.
- If the contiguous partition D is a Logical drive, its space will convert into "Free space" rather than Unallocated space, keeping the "Extend Volume" option disabled.
- Deleting partitions carries a high risk of data loss and is strongly not recommended. You must exercise extreme caution, especially when both Primary and Logical partitions coexist on the same disk.
Resizing partitions requires updating the partition table and file system. Any software error or power failure during this process can cause system boot failure or data loss. Therefore, always back up your server first and use safe partition software.
Compared to other partition tools, NIUBI Partition Editor provides unique data protection technologies and faster processing speeds:
- Virtual Mode – All operations are listed as pending for preview. Real disk partitions won't be modified until you click "Apply" to confirm.
- Cancel-at-will – You can cancel ongoing operations safely at any progress without losing data or damaging partitions.
- 1-Second Rollback – If any known error is detected while modifying partitions, it automatically reverts the server to its original status instantly.
- Hot Clone – Clone the system disk or data partition without interrupting the server. You can boot from the cloned disk immediately if the primary disk fails.
- Advanced file-moving algorithm – 30% to 300% faster when shrinking, moving, or cloning partitions.
2. Extend C Drive in Server 2019 with Safe Software
On most servers, there is plenty of free space in other partitions on the same disk. You can easily shrink these partitions to get Unallocated space. By choosing to add this unallocated space to C drive, you can solve the low disk space issue completely. The operating system, programs, and associated data remain completely intact. To do this, you just need to drag and drop on the disk map.
Download NIUBI Partition Editor, and you will see the main window with your disk partition structure. Available operations for the selected disk or partition are listed on the left and by right-clicking. Unavailable operations are hidden automatically.
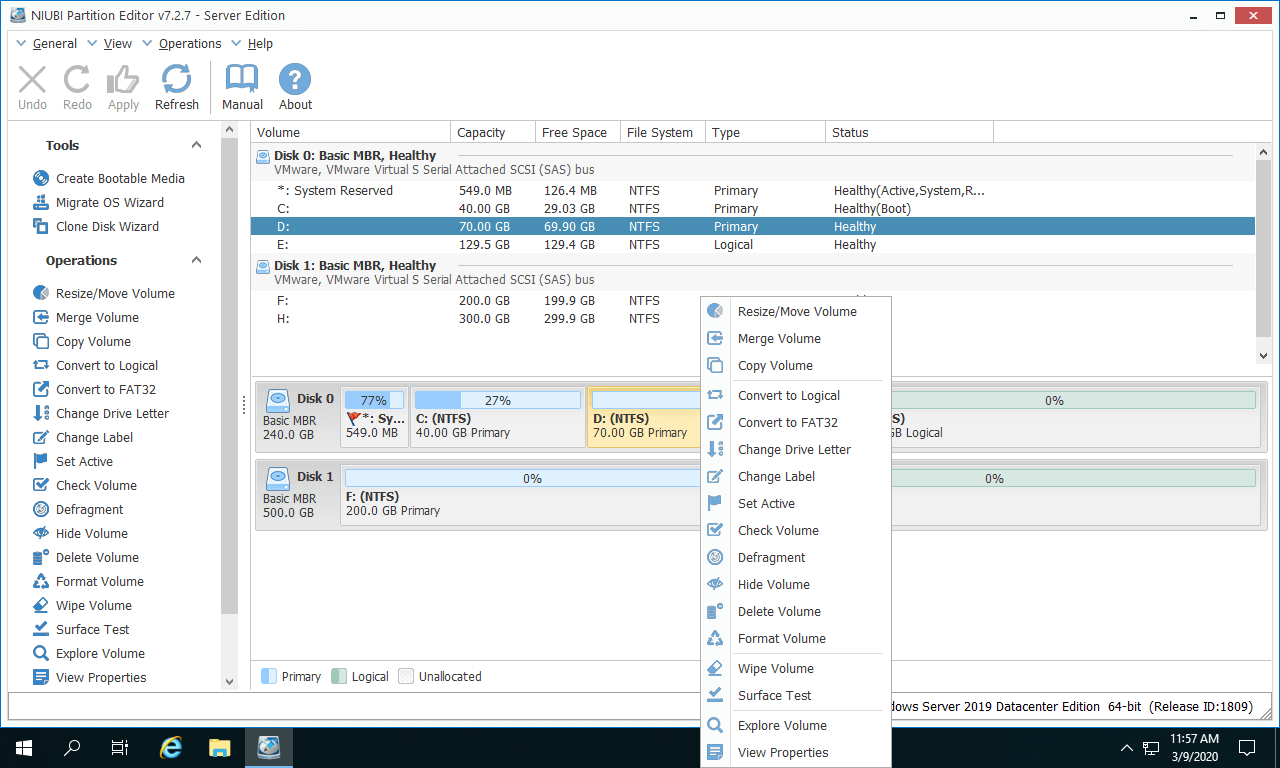
Steps to extend the C drive in Windows Server 2019 without data loss:
- Right-click the adjacent partition D and select "Resize/Move Volume". In the pop-up window, drag the left border towards the right to shrink it and create Unallocated space on the left.
- Right-click the C drive and select "Resize/Move Volume" again. Drag the right border towards the right to combine this Unallocated space.
- Click "Apply" on the top left to execute.
Watch the video to see how to extend C drive in Windows Server 2019:
- If the adjacent partition is E: instead of D:, simply replace D with E in the steps above.
- If you want to get free space from a non-adjacent partition, there is an extra step to move Unallocated space next to the C drive before extending it.
- If you made a mistake, simply click "Undo" on the top left to cancel the pending operations.
- Pending operations with the
 icon can be executed in Windows without rebooting. Operations with the
  icon require a server reboot.
 - If you use hardware RAID arrays, the steps to resize RAID partition are exactly the same. Do not break the RAID array or modify the RAID controller.
How to Safely Expand System Partitions Using Secondary Drives
The size of a physical hard disk is fixed. No partition software can transfer free space from a different disk. If there is only a C drive on the system disk, or if all partitions are full, you need to clone the disk to a larger one. After cloning, you can expand the C drive with the extra disk space. Watch the video to see how to do it:
If there are other partitions on the system disk but they are also full, you can move a data partition to another disk. Then, delete it and add its disk space to the C drive. Follow the steps to learn how to move partition in Server 2019.
3. Expand C Drive in Server 2019 Running in VMware/Hyper-V
If you run Windows Server 2019 as a virtual machine in VMware or Hyper-V, the process is exactly the same as long as there is available Unallocated space on the same virtual disk. Simply install the software inside the guest operating system and follow the steps above.
If the entire virtual disk is full, you can easily expand its size via VMware or Hyper-V settings. After expanding the disk, the additional space will appear as Unallocated at the end of the original virtual disk. You can then use NIUBI Partition Editor to move and merge this Unallocated space into the C drive.
- How to expand virtual disk size in VMware
- How to expand virtual disk size in Hyper-V
- How to move and add unallocated space to C drive
In Summary
To safely extend the C drive in Windows Server 2019, first check your disk layout and follow the corresponding method above. With NIUBI Partition Editor, this task becomes fast and safe. Beyond safely extending the C drive and reallocating free space in Windows Server 2019 and other versions, NIUBI Partition Editor provides a comprehensive toolkit to clone, convert, merge, hide, and wipe partitions, as well as scan for bad sectors and optimize file systems.
 © 2009 - NIUBI Technology All Rights Reserved. |